Data collection on Mobile Devices
CLAID Modules that collect data from Sensors are termed Sensor Modules or Collectors. They post data to a channel based on intervall rates, at specific times or by certain events. This data can be serialized to multiple formats, like CSV, JSON or binary, using the DataSaverModule. Channels also work across multiple connected devices see next tutorial via a network. You can specify what Modules to load and connect using configuration files. A simple data collection pipeline with CLAID looks as follows:

Note: Multiple Modules can use data produced by a Collector. For example, you could let a Machine-Learning-Module analyze incoming data, while a DataSaverModule is recording it. To learn more about how CLAID tackles data collection and how it is distinguished from other existing frameworks, refer to the page describing our data-collection-methodology.
We will demonstrate how to collect and record data using the DataSaverModule with 3 examples in the following sections. They should work the same way across Android, iOS and WearOS. For using the DataSyncModule, check the subsequent Tutorial 2.4.
Please note: The data collection here only continues to work in the background, if you have set up CLAID to run in the background (cf. Tutorial 2.2). Otherwise, the data collection will stop when the App is minimized.
Prerequisites
For this tutorial, we will change the configuration file of an existing CLAID App to load and configure collectors, and set up data storage. We expect that you have completed tutorial series 1 and have a CLAID App available either on Android/WearOS, iOS or cross-platform via Flutter.
Data collection packages
With CLAID, we provide existing Modules for data collection via various packages. Check out the package overview to see existing Modules and packages!
A note on existing Collectors
Please note, that while we provide packages containing Collectors for common sensors on Android, iOS and WearOS it is not our goal to support all possible sensors. Instead, we aim to streamline and standardize the process of data collection, making it easier to build complex data collection applications with various and complex sensors. Read our data collection methodology.
1. The CLAID configuration file
If you have followed Tutorial Series 01, you should have a CLAID App with a configuration file already. You can typically find it in the assets folder (Android/iOS) or in the Resource bundle (iOS). You can find it with your IDE (e.g., Android Studio) from the respective folder. It looks as follows:
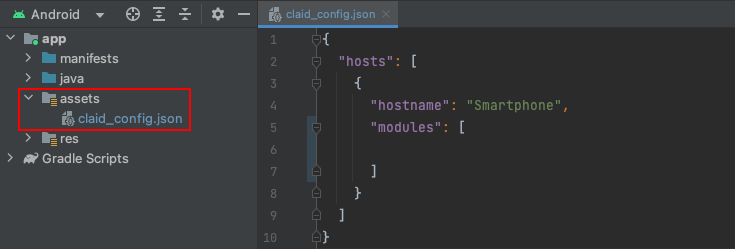
Inside the configuration file, we can include the Modules we want to use.
2. Recording the Battery Level to JSON files (Example 1)
For our first example, we want to record the battery level of the device (i.e., smartphone or smartwatch) periodically. A corresponding BatteryCollector already comes with CLAID (no extra package required).
For this example, we will require two Modules:
- BatteryCollector: A Module reading out the battery level and charging state and posting the data to a channel.
- DataSaverModule: A Module saving all incoming data from the Channel that the BatteryCollector posts to in one or multiple files on the device.
For this example, we use the configuration file as seen below. This configurations allows to record the battery level and charging state, with one sample being collected every 5 seconds to a JSON file.
CLAID JSON configuration
A CLAID configuration for using the BatteryCollector and the DataSaverModule. A step-by-step explanation is provided below.
{
    "hosts": [
        {
        "hostname": "Smartphone",
        "modules": [
            {
                "type": "BatteryCollector",
                "id": "MyBatteryCollector",
                "properties": {
                    "samplingSchedule": {
                        "periodic": [
                            {
                                "period_seconds": 5
                            }
                        ]
                    }
                },
                "output_channels": {
                    "BatteryData": "MyBatteryChannel"
                }
            },
            {
                "type": "DataSaverModule",
                "id": "MyDataSaverModule",
                "properties": {
                    "storagePath": "%media_dir/files",
                    "fileNameFormat": "%d.%m.%y/battery_data_%H-%M-%S.json",
                    "fileType": "json",
                    "overrideExistingFiles": false
                },
                "input_channels": {
                    "DataChannel": "MyBatteryChannel"
                }
            }

        ]
        }
    ]
}
Step-by-step explanation of the configuration file
A CLAID configuration file contains a list of hosts, each having an unique name. Each host represents one device that will execute CLAID. It can be, for example, a smartphone and a Server. Each host can connect to other hosts (see next tutorial). Here, we only have one host, called "Smartphone". Each host can be run by multiple users. In a study, we might have multiple users that run a host called "Smartphone" (e.g., one user per each phone in a study). They are then distinguished by their user ID, which can be specified when starting CLAID (cf. Tutorial 2.1).
Each host can have multiple Modules, defined as a JSON array. Modules are the building blocks of a CLAID application. They can for example be used to collect data from sensors.
{
"type": "BatteryCollector",
"id": "MyBatteryCollector",
"properties": {
"samplingSchedule": {
"periodic": [
{
"period_seconds": 5
}
]
}
}
}
This specifies that we want to load a Module at runtime. The "type" attribute specifies the type of Module to load, which needs have been registered to CLAID. The "id" attribute is used to identify the Module within the application, and needs to be an unique name for the Module. The "properties" attribute is used to specify the properties of the Module. In this case, we specify that the Module should sample data periodically at a rate of 5 seconds. The properties are defined by each Module individually. To know which properties a Module needs, check out the documentation of the Module.
The BatteryCollector has one output Channel, called "BatteryData", on which it will post data every 5 seconds as defined above. We can give the BatteryData Channel any name, in this case "MyBatteryChannel". This name is used to connect the output of the BatteryCollector to the input of other Modules, e.g. to connect the output of the BatteryCollector to the input of the DataSaverModule. Channels with the same name are connected to each other.{
"type": "DataSaverModule",
"id": "MyDataSaverModule",
"properties": {
"storagePath": "%media_dir/files",
"fileNameFormat": "%d.%m.%y/battery_data_%H-%M-%S.json",
"fileType": "json",
"overrideExistingFiles": false
},
}
- storagePath: Path to a folder where data shall be stored. %media_dir here is a special identifier for the media directory of the device. On Android/WearOS, this will typically be "/sdcard/Android/media/your.app.name/", and is publicly accessible by all Apps or file managers. On iOS, this path typically is the public shared Documents folder of the App, which you can also find from the Files app on your device.
- fileNameFormat: Format describing how to name recorded files. You can optionally use time format identifiers to automatically name the files containing current date and time information (e.g., %y.%m.%d will be year.month.date of when the data was recorded). If by this format, two subsequent samples will belong to different files, the DataSaverModule will automatically create new files accordingly. You can also specfify subfolders this way: %y.%m.%d/%M-%S.xml would store data in a folder year.month.date and create files for every Minute-Second. If you do not specify time format identifiers, all data will be stored in a single file.
- fileType: Specifies what serializer shall be used to serialize incoming data. Common options are JSON, CSV or Binary.
- overrideExistingFiles: If true, existing files will be overwritten, if there is already a file with the sanme name. If false, the file will be appended.
The properties of the two Modules are described further in the following (you can also check out the Step-by-step explanation of the configuration file above, for more details and examples!):
Description of properties for the Modules
- samplingSchedule: A Schedule Defining when data is collected. Schedule allows to define arbitrary intervals, exact times or time frames.
- storagePath: Path to a folder where data shall be stored. %media_dir here is a special identifier for the media directory of the device. On Android/WearOS, this will typically be "/sdcard/Android/media/your.app.name/", and is publicly accessible by all Apps or file managers. On iOS, this path typically is the public shared Documents folder of the App, which you can also find from the Files app on your device.
- fileNameFormat: Format describing how to name recorded files. You can optionally use time format identifiers to automatically name the files containing current date and time information (e.g., %y.%m.%d will be year.month.date of when the data was recorded). If by this format, two subsequent samples will belong to different files, the DataSaverModule will automatically create new files accordingly. You can also specfify subfolders this way: %y.%m.%d/%M-%S.xml would store data in a folder year.month.date and create files for every Minute-Second. If you do not specify time format identifiers, all data will be stored in a single file.
- fileType: Specifies what serializer shall be used to serialize incoming data. Common options are JSON, CSV or Binary.
- overrideExistingFiles: If true, existing files will be overwritten, if there is already a file with the sanme name. If false, the file will be appended.
You can now rebuild and run the application in Android studio or Xcode. Using a file explorer on your PC, you should be able to see that new files will be created under the storage path we specified in the configuration on the device. Check out the example below:
Viewing the recorded data
On Android/WearOS, the data is stored under /sdcard/Android/media/your_app_name/files. You can easily view the data from the device explorer view:
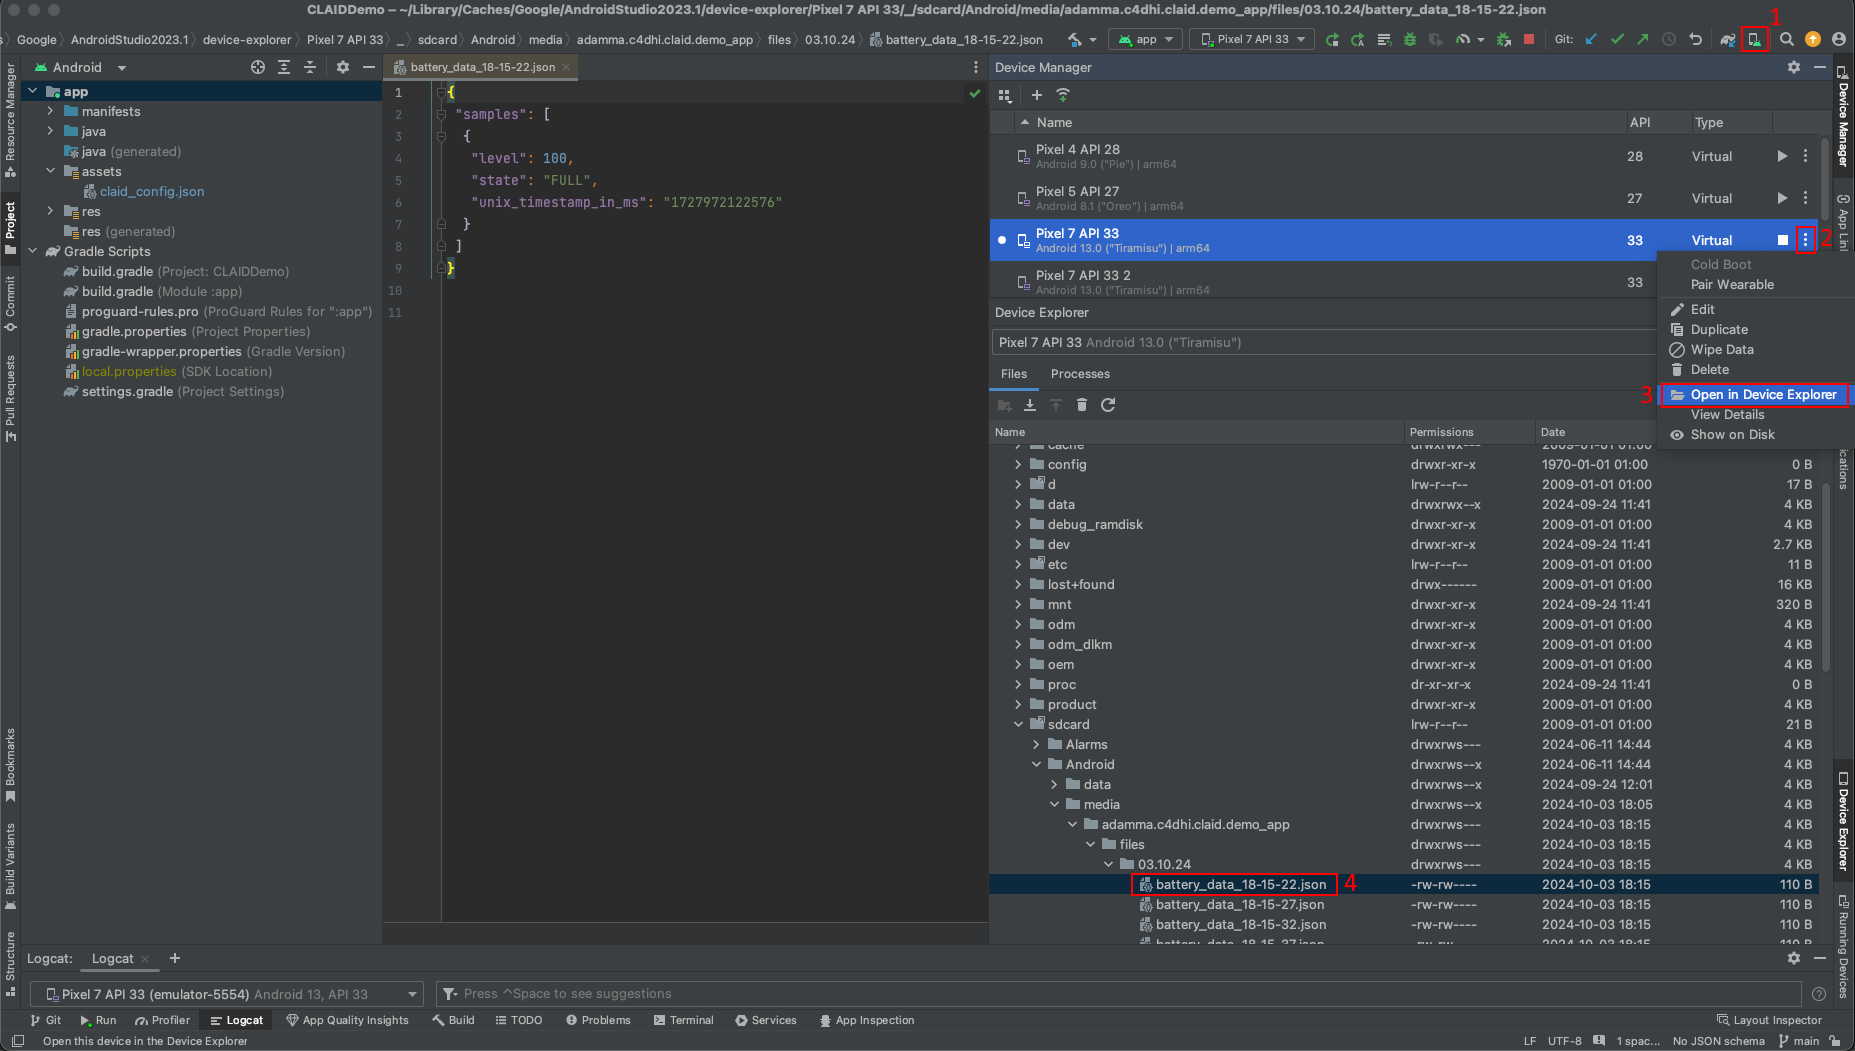
Recorded battery data typically looks like this:
The file can contain multiple samples, depending on how you configured the DataSaverModule (e.g., one file per minute or one file per hour). The "state" can be one of the following:
- UNKNOWN
- UNPLUGGED
- FULL
- CHARGING
- USB_CHARGING
- AC_CHARGING
- WIRELESS_CHARGING
I do not see any files
In case you cannot see the files at the folder that we specified under
Note that under Android /sdcard/ refers to the INTERNAL storage (not an SD card!), while ext_sdcard/ refers to an inserted SD card.
3. Recording Accelerometer Data to JSON files (Example 2)
For the second example, we will measure acceleration using the device's accelerometer at 50Hz and save the data to JSON files. This example demonstrates data collection at higher sampling rates. Typical ranges for the sampling frequency of an accelerometer in smartphone is roughly up to 300Hz. We will use the AccelerometerCollector Module, which comes with CLAID (no additional package required).
Consider the configuration below. With this configuration, the AccelerometerCollector will output samples at 50Hz, which are saved to a JSON file by the DataSaverModule once per hour.
CLAID JSON configuration
A CLAID configuration for using the AccelerometerCollector and the DataSaverModule. A step-by-step explanation is provided below.
{
    "hosts": [
    {
        "hostname": "Smartphone",
"modules": [
{
"type": "AccelerometerCollector",
"id": "MyAccelerometerCollector",
"properties": {
"samplingFrequency": 50
},
"output_channels": {
"AccelerationData": "MyAccelerometerChannel"
}
},
{
"type": "DataSaverModule",
"id": "MyDataSaverModule",
"properties": {
"storagePath": "%media_dir/files",
"fileNameFormat": "%d.%m.%y/accelerometer_data_%H.json",
"fileType": "json",
"overrideExistingFiles": false
},
"input_channels": {
"DataChannel": "MyAccelerometerChannel"
}
}
]
}
]
}
Step-by-step explanation of the configuration file
A CLAID configuration file contains a list of hosts, each having a unique name. Each host represents one device that will execute CLAID. Here, we only have one host, called "Smartphone".
Each host can have multiple Modules, defined as a JSON array. Modules are the building blocks of a CLAID application.
{
"type": "AccelerometerCollector",
"id": "MyAccelerometerCollector",
"properties": {
"samplingFrequency": 50
},
This specifies that we want to load an AccelerometerCollector Module. The "id" attribute is used to identify the Module within the application. In the "properties", we set the sampling frequency to 50 Hz. The "type" needs to be known (i.e., registered) to CLAID. The "id" needs to be unique across the configuration.
The AccelerometerCollector has one output Channel, called "AccelerationData", which we name "MyAccelerometerChannel". This name is used to connect the output to other Modules.
{
"type": "DataSaverModule",
"id": "MyDataSaverModule",
"properties": {
"storagePath": "%media_dir/files",
"fileNameFormat": "%d.%m.%y/accelerometer_data_%H.json",
"fileType": "json",
"overrideExistingFiles": false
},
This specifies a DataSaverModule to save the accelerometer data. The "properties" define where and how to save the data. The data will be saved in JSON format, with files named by date and hour. For the details of the properties check the step-by-step explanation of Example 1 above.
This connects the DataSaverModule's input to the AccelerometerCollector's output channel, allowing it to receive and save the accelerometer data.
You can now rebuild and run the application in Android studio or Xcode. Using a file explorer on your PC, you should be able to see that new files will be created under the storage path we specified in the configuration on the device.
Example data collected by the AccelerometerCollector
The AccelerometerCollector will produce data in the following format:
{
"samples": [
{
"unix_timestamp_in_ms": 1623456789123,
"x": 0.12,
"y": -0.34,
"z": 9.81
},
{
"unix_timestamp_in_ms": 1623456789143,
"x": 0.11,
"y": -0.33,
"z": 9.82
},
{
"unix_timestamp_in_ms": 1623456789163,
"x": 0.13,
"y": -0.35,
"z": 9.80
},
{
"unix_timestamp_in_ms": 1623456789183,
"x": 0.12,
"y": -0.34,
"z": 9.81
},
{
"unix_timestamp_in_ms": 1623456789203,
"x": 0.10,
"y": -0.32,
"z": 9.83
}
]
}
Where:
unix_timestamp_in_msis the Unix timestamp in seconds with millisecond precisionx,y, andzare the acceleration values in m/s² along the respective axes
4. Recording Audio Data to MP3 files (Example 3)
... coming soon
Bonus: Using all sensors simultaneously
For a more comprehensive data collection setup, you can configure CLAID to use multiple sensors simultaneously. Here's an example configuration that incorporates the battery and accelerometer sensors:
CLAID JSON configuration for multiple sensors
{
"hosts": [
{
"hostname": "Smartphone",
"modules": [
{
"type": "BatteryCollector",
"id": "MyBatteryCollector",
"properties": {
"samplingSchedule": {
"periodic": [
{
"period_seconds": 5
}
]
}
},
"output_channels": {
    "BatteryData": "MyBatteryChannel"
}
},
{
"type": "AccelerometerCollector",
"id": "MyAccelerometerCollector",
"properties": {
"samplingRate": 50
},
"output_channels": {
"AccelerationData": "MyAccelerometerChannel"
}
},
{
"type": "DataSaverModule",
"id": "MyBatteryDataSaver",
"properties": {
"storagePath": "%media_dir/files/battery",
"fileNameFormat": "%d.%m.%y/battery_data_%H-%M-%S.json",
"fileType": "json",
"overrideExistingFiles": false
},
"input_channels": {
    "DataChannel": "MyBatteryChannel"
}
},
{
"type": "DataSaverModule",
"id": "MyAccelerometerDataSaver",
"properties": {
"storagePath": "%media_dir/files/accelerometer",
"fileNameFormat": "%d.%m.%y/accelerometer_data_%H.json",
"fileType": "json",
"overrideExistingFiles": false
},
"input_channels": {
    "DataChannel": "MyAccelerometerChannel"
}
}
]
}
]
}
This configuration sets up two collectors (Battery and Accelerometer) and two corresponding DataSaverModules to store the data from each sensor. Each sensor's data is saved in a separate directory with an appropriate file format.
Common issues
Common issues when storing data to files
If you run the examples above and notice that no files are created, this potentially can have multiple causes. Keep in mind the following aspects, even if you build data collection applications without CLAID:
Android & WearOS:
- Since Android 11, we have something that is called scoped storage. By introducing scoped storage, Apps can only access their own app-specific directory by default. Accessing all files on the internal storage (/sdcard/) has become a bit more complicated, as only "externalStorageManager apps" are allowed to do so. This requires the user to allow an App to act as storage manager on a separate settings page. On Android 10, we additionally have to specify the requestLegacyExternalStorage flag.
- In general, check whether storage permissions have been granted on the Apps settings page.
iOS:
All systems:
- make sure to not store many small files in few directories. If you for example store data of each second in a separate file, this will clutter the file system, resulting in increased response times. It might happen, that you can not store files anymore, since the file system reacts too slow. Avoid this situation, as deleting all the files to fix the problem would be very slow aswell