Adding a new Sensor Module to a CLAID package
In this tutorial, we will show you how you can add a visualization for a CLAID Module. Visualizations are optional and are typically used in the following scenarios:
- Data visualization: You have a SensorModule which collects data passively, and you want to show some of the data to the user, e.g., the heart rate over time.
- User input: You want to collect data in a way that requires active user participation, e.g., using a spirometer or filling out a questionnaire.
- User instructions: Instructions for the user to perform a certain task, e.g., as recommended by a machine learning model.
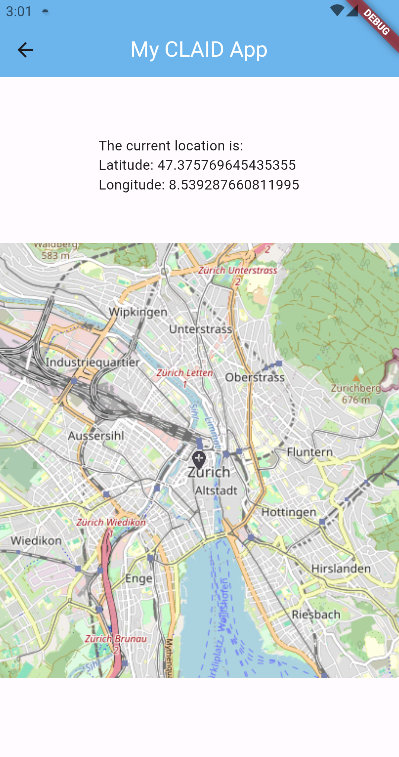
In this tutorial, we continue where we have left off in the previous part and will now add a visualization for our LocationSensorModule, which could look as follows:
You can create visualizations for CLAID Modules written in any supported programming language. For example, in this tutorial, we will use Flutter to visualize the LocationSensorModule written in Java. Visualizations simply wrap around the CLAID Module. Creating visualizations includes:
- Creating a new ModuleView (a view is simply a stateful Flutter Widget).
- Assigning the ModuleView to a ModuleClass (mapping the class name of a Module to the view).
- Exchanging data between the View and the Module. This typically involves sharing data across programming languages.
Prerequisites
We typically do visualizations for CLAID Modules with Flutter, hence in this tutorial we will use a CLAID Flutter App to add visualizations for a Module. You can, however, apply this tutorial to other UI frameworks as well.
Before you begin this tutorial, please make sure you have met the following requirements:
- You have prepared a CLAID Flutter App
- You have completed the previous Part 3 of this tutorial series.
1. Creating a new ModuleView
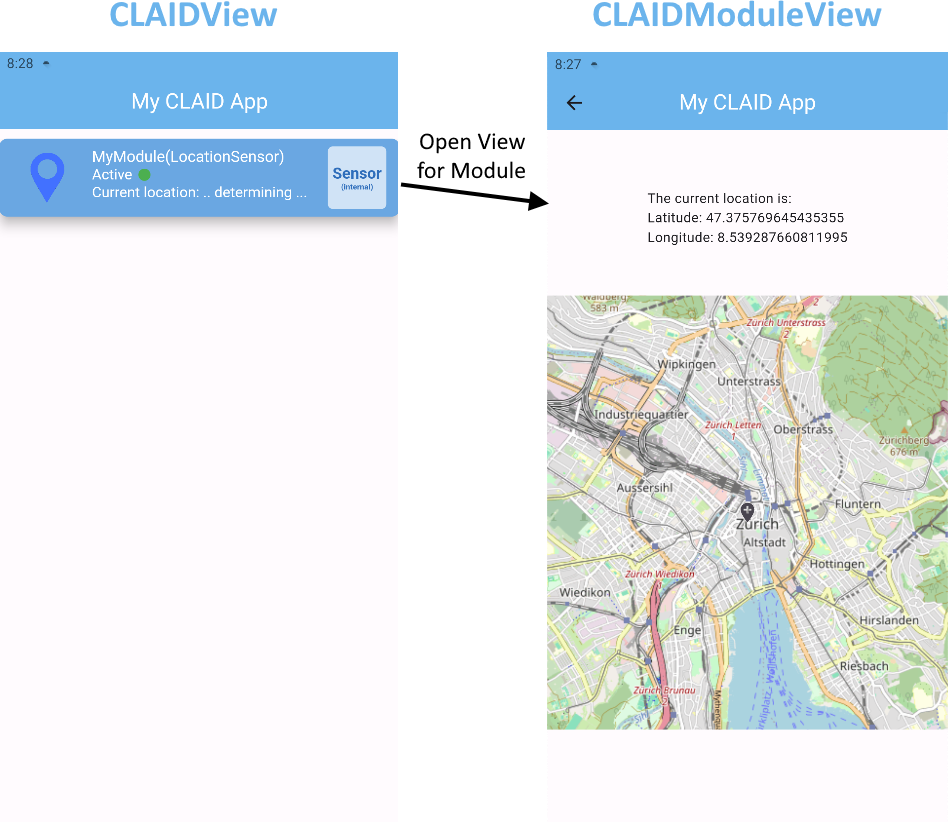
A CLAIDModuleView is a Widget which is assigned to a certain Module class. For example, in CLAID there are views for the AccelerationModule, the CoughDetectorModule, the AudioRecorderModule, etc. A CLAIDModuleView can be opened by selecting the Module from the CLAIDView:
When you specify a CLAID Module in the configuration file, CLAID automatically creates the corresponding Widget on startup and adds it to the CLAIDView. If you use multiple instances of the same type of Module, each get's their own instance of the View. Check out the instructions below on how to add a new CLAIDModuleView:
Adding a new ModuleView
To create a new CLAIDModuleView, we create a new stateful Widget, which inherits from CLAIDModuleView. Check out the instructions below, mind the tabs for the 3 steps.
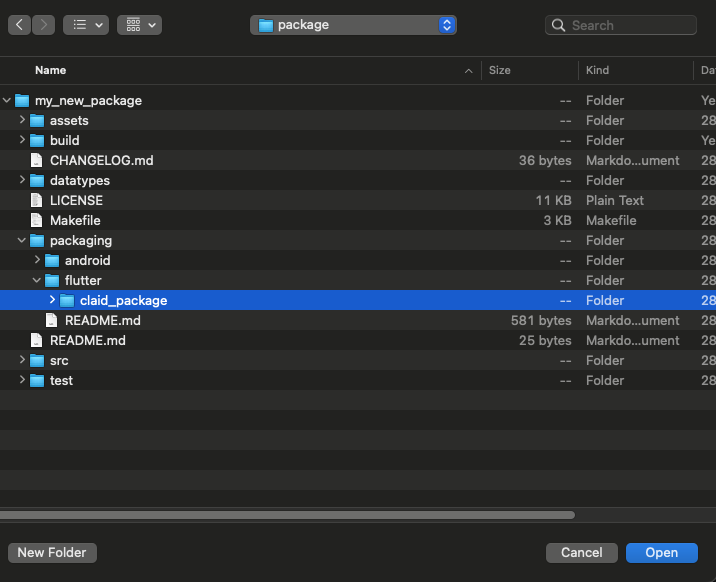
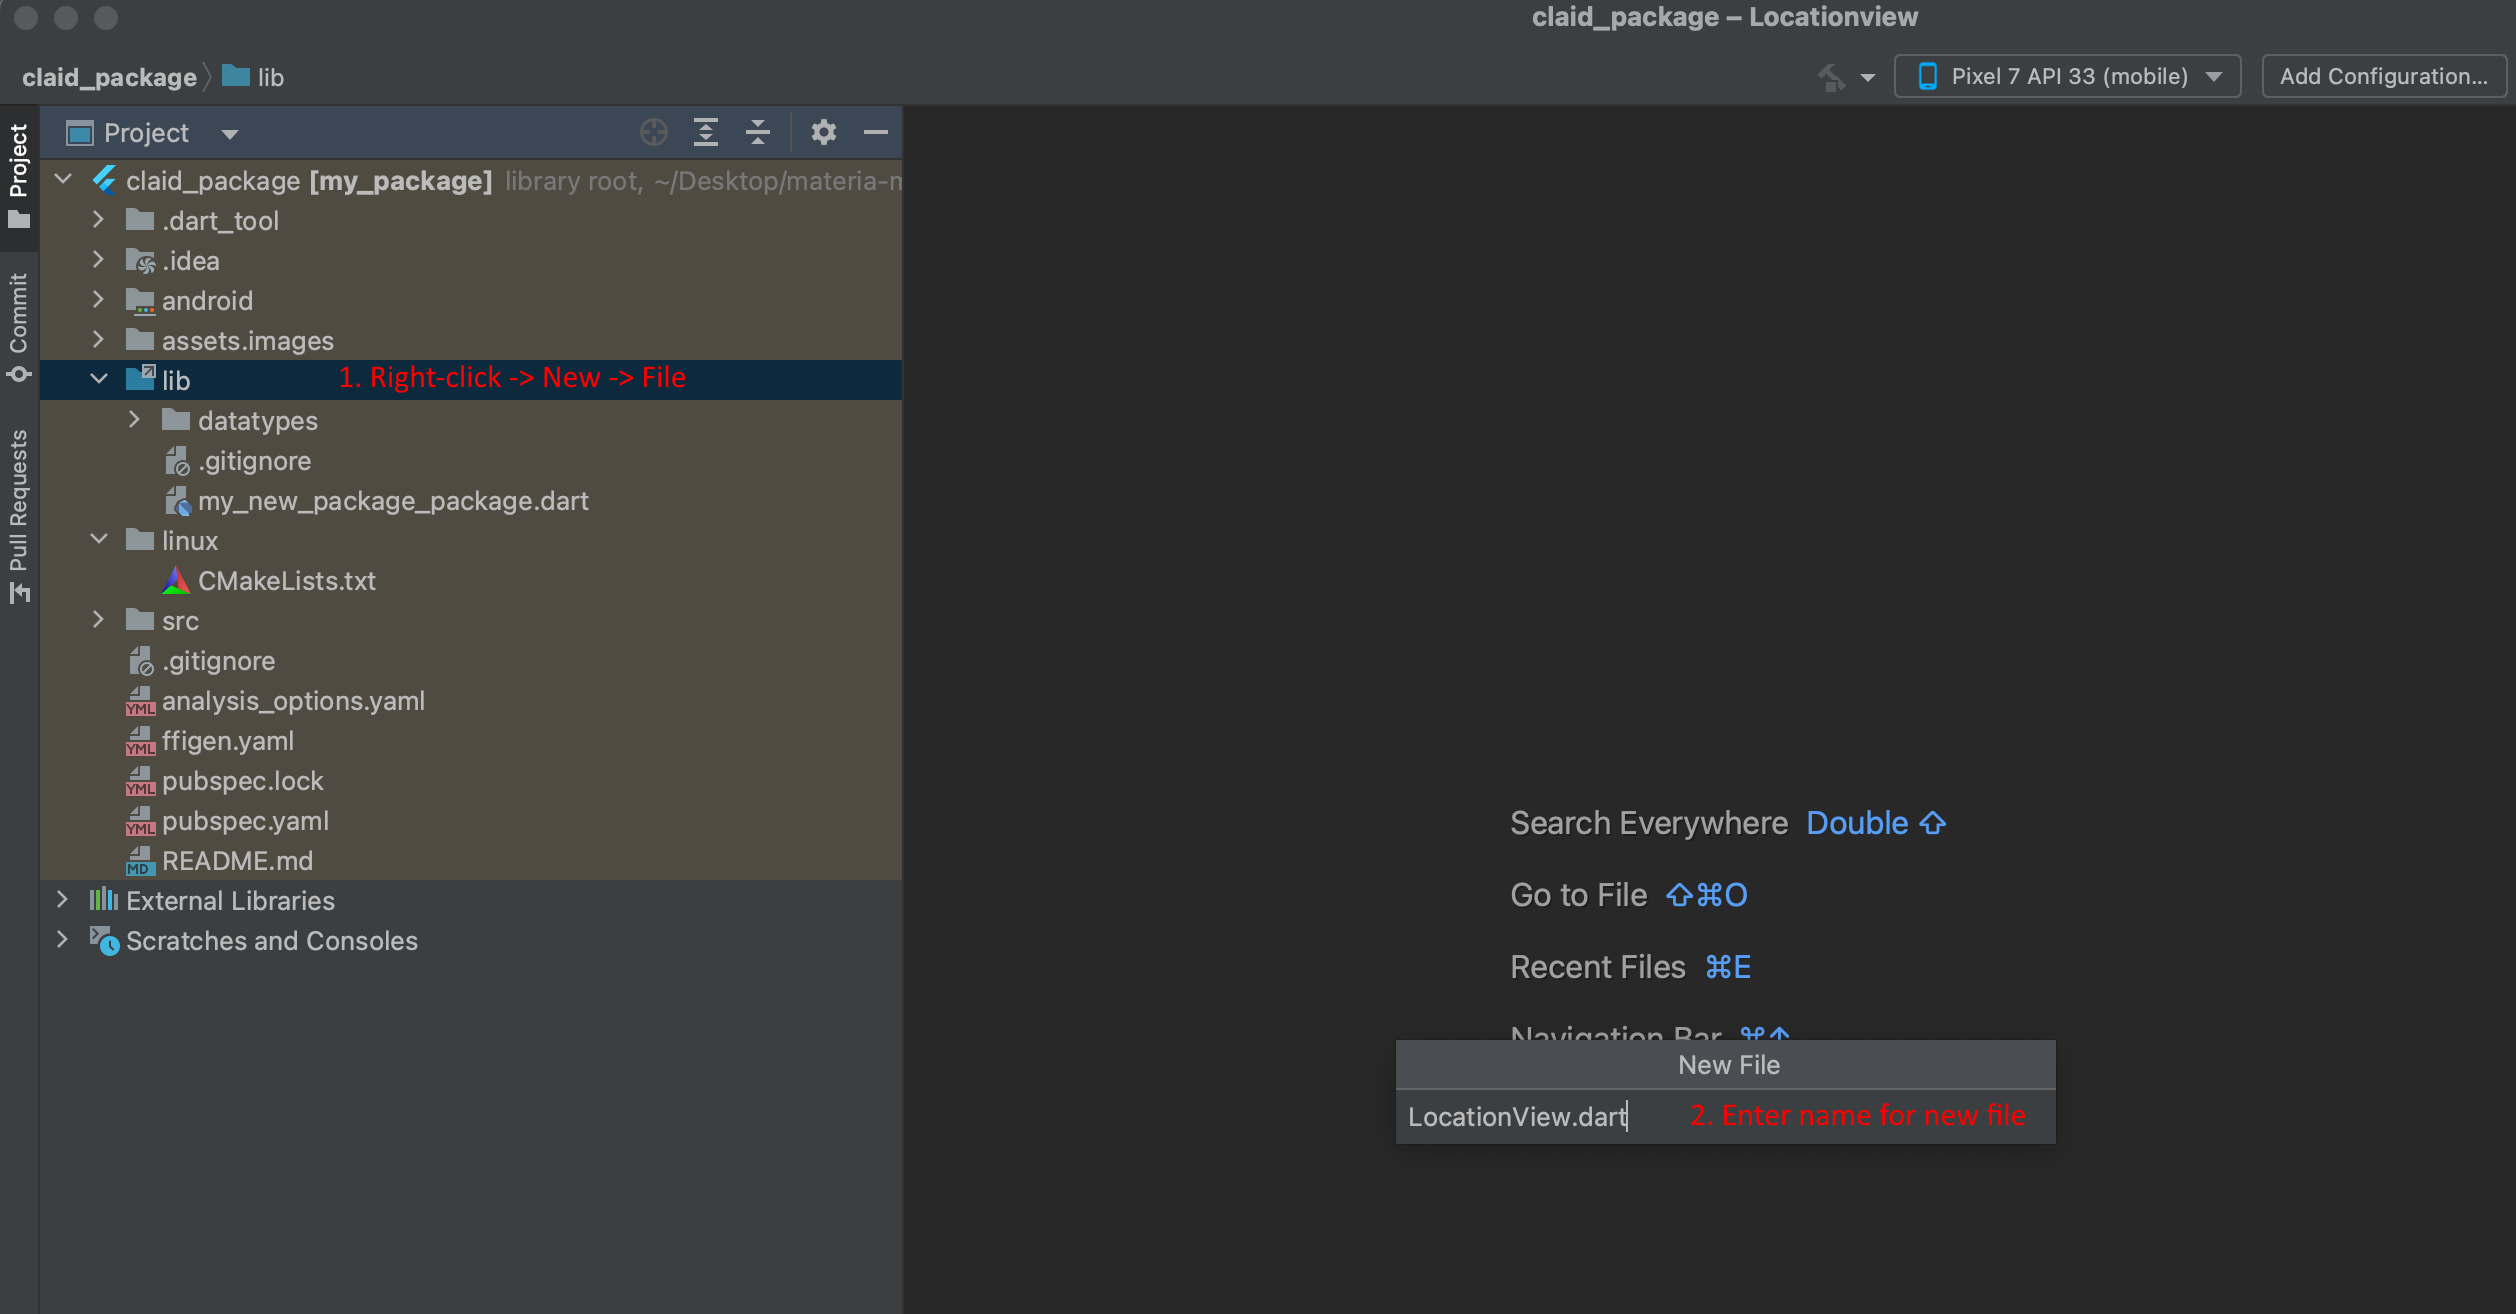
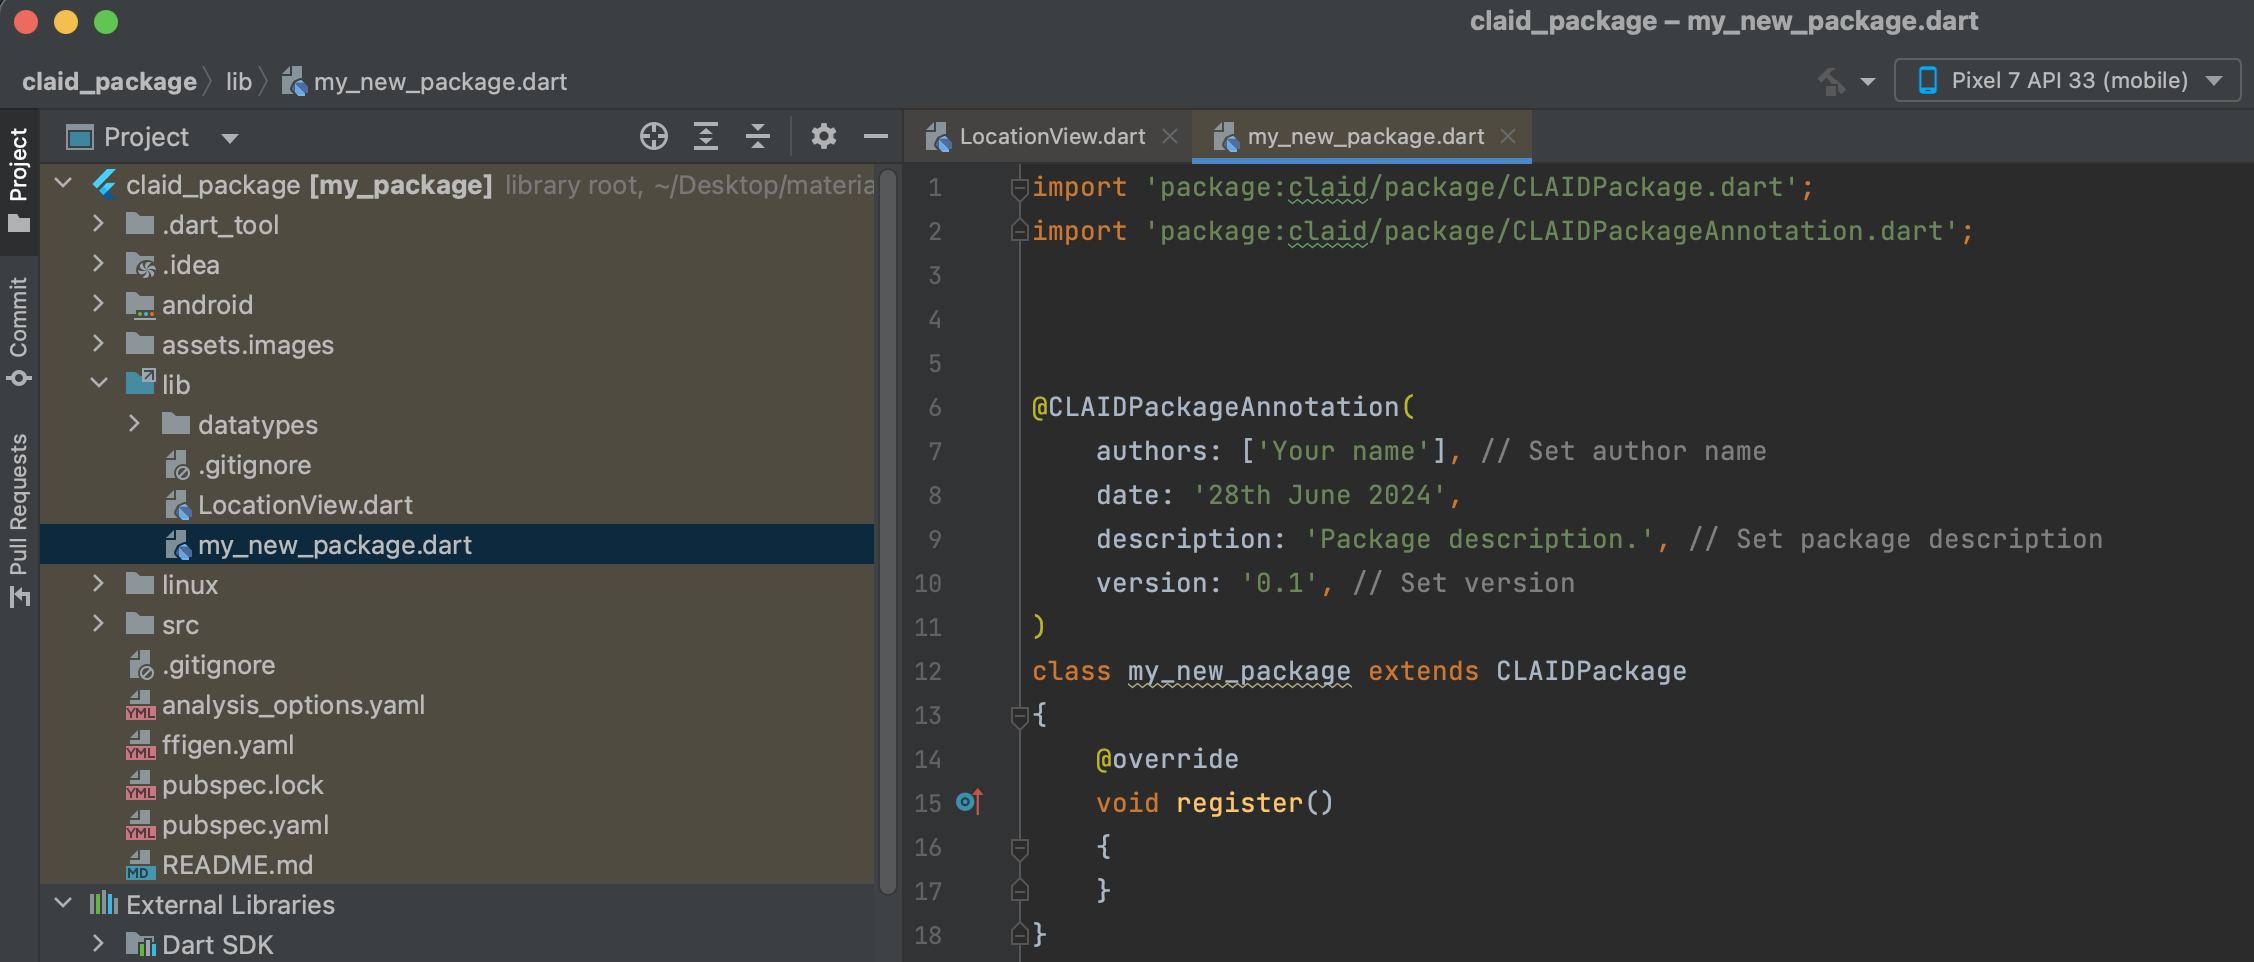
From Android Studio, click File->open and then select the folder "packaging/flutter/claid_pckage" from your CLAID package:
Add a new file called "LocationView.dart" (make sure you specify the .dart file extension).
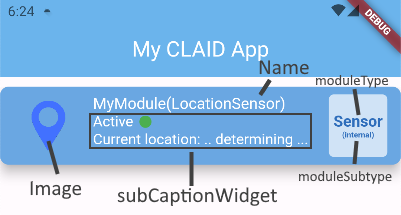
The code below shows the basic implementation of a CLAIDModuleView, here called "LocationView". A CLAIDModuleView typically has the following components:
- State (LocationViewState): This is the actual visualization shown to the user. It is a stateful widget which is shown when the user clicks on the Module from the CLAIDView.
- SubCaptionWidget: Widget displayed "on" the button in the CLAIDView.
- image: The icon for the Visualization, shown on the left side of the button.
- Module type: A type of the Module (can be any string), shown on the right side of the button.
- Module subtype: A subtype of the Module (can be any string), shown on the right side of the button below the type
Check the following picture for reference:
The following code defines a new LocationView inheriting from CLAIDModuleView. Check the comments in the code for further explanation.
import 'package:claid/ui/CLAIDModuleView.dart';
import 'package:flutter/material.dart';

// A LocationView is a CLAIDModuleView, i.e., it provides
// a visualization for a certain type of Module.
class LocationView extends CLAIDModuleView {

    // The constructor HAS too look like this.
    // You can NOT add or remove any parameters here.
    LocationView(
        super.entityName,
        super.mappedModuleId, super.moduleClass,
        super.moduleManager, {super.key});

    @override
    State<LocationView> createState() => _LocationViewState();

    // The subCaptionWidget is the widget displayed "on the button" at the CLAIDView.
    // The CLAIDView is the view you typically see at the HomePage of a CLAID App,
    // where all of the currently running Modules are displayed.
    // You can adapt this according to your needs.
    @override
    Widget getSubCaptionWidget()
    {
        return const Column(
            crossAxisAlignment: CrossAxisAlignment.start, // for left side
            children: [
                Row(
                    children: [
                    Text(
                        "Active",
                        style:TextStyle(fontSize: 15, color: Colors.white)
                    ),
                    SizedBox(width:5),
                    Icon(
                        Icons.circle,
                        size: 15,
                        color: Colors.green,
                    ),
                    ],
                ),
                Text(
                    "Current location: .. determining ...",
                    style:TextStyle(fontSize: 15, color: Colors.white)
                ),
            ]
        );
    }

    // This is the image that will be displayed on the button on the CLAIDView page.
    // Choose a suitable icon for your view.
    Widget getImage(BuildContext context)
    {
        // Add an icon of your choice. You can put it in the assets folder of the package.
        String imagePath = "packages/my_new_package/assets/images/location_icon.png";
        return Image.asset(
            imagePath,
            height: MediaQuery.of(context).size.height * 0.075,
            width: MediaQuery.of(context).size.width * 0.125,
        );
    }

    // The name of the View, which will be displayed on top of the button in the CLAIDView.
    String getName()
    {
        return super.mappedModuleId + "(LocationSensor)";
    }

    // What type of Module is this View providing a visualization for.
    // You can choose any name you like, typically one of "Sensor", "AI", "Module", ...
    // Will be displayed on the right side of the button in the CLAIDView
    String getModuleType()
    {
        return "Sensor";
    }
    // Subtype or description of the Module.
    // You can choose anythink you like, typically one of "(internal)", "(Bluetooth)", "(Offloaded", ...
    // Will be displayed on the right side of the button in the CLAIDView, below the ModuleType.
    String getModuleSubType()
    {
        return "(internal)";
    }
}


class _LocationViewState extends State<LocationView> with AutomaticKeepAliveClientMixin
{
    // Actual implementation of the View. Create your visualizations here.
    @override
    Widget build(BuildContext context) {
        // Add your code here.
        // We will expand on this during the rest of the tutorial.
        return Text("This is just a test");
    }

    bool get wantKeepAlive => true;
}
2. Assigning the ModuleView to a ModuleClass
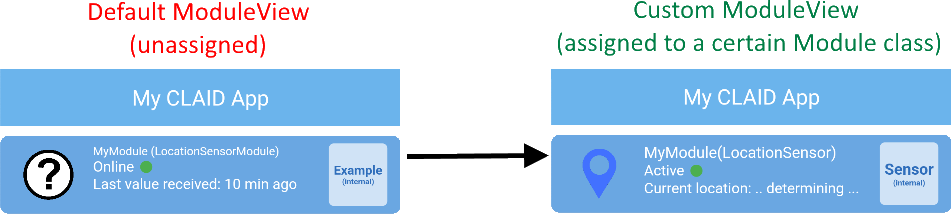
Once you created a new ModuleView, you need to assign it to a Module class in order to use it. By default, CLAID does not know which View is associated with which type of Module. Check the picture below for reference: If you currently load the LocationSensorModule from a CLAID App, you will get a default ModuleView (left), however we want to make CLAID use our new LocationView for the LocationSensorModule (right).
To assign the LocationView to the LocationSensorModule, check out the instructions below:
Assigning the LocationView to the LocationSensorModule
We assign a View to a Module when our package is loaded by CLAID. To do so, we can update the "register()" function of our package main file (similiar as to how we registered our LocationSensorModule to CLAID). To do so, find and open the package main file from the source files. It has the same name as the package, in this case "my_new_package.dart":
Add the following code to assign the View to the LocationSensorModule.
class my_new_package extends CLAIDPackage
{
    @override
    void register()
    {
        CLAID.registerViewClassForModule("LocationSensorModule", LocationView.new);
    }
}
The string needs to match EXACTLY the name of the Module as it was registered to CLAID.
3. Exchanging data between the View and the Module
The View and Module are strictly decoupled, i.e., there is no direct dependency between View and Module. In order to receive data from the Module and/or interact with it, there are two options for a View:
- The View can subscribe to any Channel that is posted by the Module and automatically receives new data whenever it is available.
- The View can call registered remote functions (setters and getters) of the Module. Particularly useful if the Module requires settings which were entered by the user to the View.
Check out the instructions below to see how the two alternatives can be used:
Exchanging data between Module and View
A CLAIDModuleView can exchange data with a Module either via Channels or via remote functions. Both methods can also be used together. The following code only affects the LocationViewState part of the code.
To subscribe to a Channel of a Module from a View, we can use the "subscribe_module_channel" function, to which you have to pass the name of the Channel as parameter. Note, that this is the name of the Channel as published in the Module, not the name of the Channel from the configuration file.
import 'datatypes/my_package_datatypes.pb.dart';
...
class _LocationViewState extends State<LocationView> with AutomaticKeepAliveClientMixin
{
    LocationSensorData _currentData = LocationSensorData();
    @override
    void initState() {
        // Subscribe to updates from the LocationChannel.
        widget.subscribeModuleChannel(
            "LocationChannel",
            LocationSensorData(),
            (data) => onLocationData(data));
    }

    // Will be called whenever the LocationSensorModule posts
    // new data to the LocationChannel.
    void onLocationData(LocationSensorData data)
    {
        // Update the view with the new location data.
        setState(() {
            _currentData = data;
        });
    }


    // Actual implementation of the View. Create your visualizations here.
    @override
    Widget build(BuildContext context) {
        // Display the current location.
        return Text(
            "The current location is:\n"
                "Latitude: ${_currentData.latitude}\n"
                "Longitude: ${_currentData.longitude}"
        );
    }
    bool get wantKeepAlive => true;

}
...
CLAID Modules and Views can remotely call functions of any other Module via remote functions across languages. Thus, you can tunnel function calls for example from Dart to Java, Python or C++ and vice versa. The only precondition is that a Module has registered a remote function under an unique name.
The benefit of remote functions over subscribing to channels is that you can pass parameters to the function. The disadvantage is that you have to poll for new data, by calling the function periodically.
- Adding a remote function to the LocationSensorModule (Java)
Switch back to the Android/Java part of the package, where we have defined the LocationSensorModule. Add a new public (!) function called "getLocation". This function will return the last known location.Register the function in the initialize function of the Module:// Make sure the function is public (!!) public LocationSensorData getLocation() { return lastLocationData; }You can use any CLAID (protobuf) data type as for function return and parameters. Functions can have an arbitrary number of parameters.@Override protected void initialize(Properties properties) { ... // Register the remote function. // Make sure the name ("getLocation") matches EXACTLY (!!) the actual function name. registerRemoteFunction("getLocation", LocationSensorData.class); ... } - Calling the remote function from the LocationView (Dart)
We can now map and call the remote function registered in the LocationSensorModule from our LocationView in dart.
To do so, we can use "mapFunction" to map the function and then execute it. To update the location periodically,
we use a Timer to call the "getLocation" function every two seconds. Check out the code below.
class _LocationViewState extends State<LocationView> with AutomaticKeepAliveClientMixin
{
    LocationSensorData _currentData = LocationSensorData();

    // Create a RemoteFunction object, which we will initialize in the initState function.
    late RemoteFunction<LocationSensorData> getLocation;
    @override
    void initState() {

        // Map the function "getLocation" of the assigned CLAID Module.
        // As we assigned the LocationView to the LocationSensorModule,
        // mapFunction will map the function of the LocationSensorModule.
        getLocation = widget.mapFunction("getLocation", LocationSensorData(), []);

        // Call function every 2 seconds.
        Timer.periodic(
            const Duration(seconds: 2),
                (Timer t) =>
                    // Execute the getLocation function, forward result to onLocationDat.
                    getLocation.execute([]).then(
                            (locationData) => onLocationData(locationData!)
                    )
        );
    }

    // Called periodically whenever the getLocation remote function returns.
    void onLocationData(LocationSensorData data)
    {
        // Update the view with the new data.
        setState(() {
            _currentData = data;
        });
    }


    // This widget is the root of your application.
    @override
    Widget build(BuildContext context) {
        return Text(
            "The current location is:\n"
                "Latitude: ${_currentData.latitude}\n"
                "Longitude: ${_currentData.longitude}"
        );
    }
    bool get wantKeepAlive => true;

}
Cannot find data type LocationSensorData
If you get the error unknown data type LocationSensorData, do the following:
-
Build flutter package, to generate the data types check here for reference:
-
Run pub get
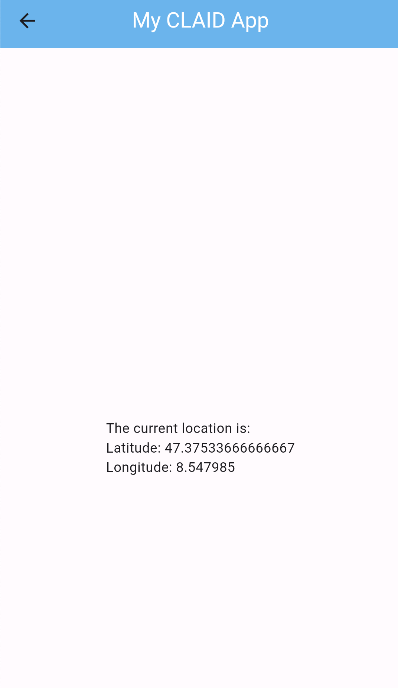
When done correctly, you should see the current location updated periodically (make sure to open the LocationView by pressing on the button of the Module from the CLAIDView).
Bonus: Adding a map to visualize the location
Of course, displaying the current latitude and longitude simply as a text is rather boring. With Flutter, we have access to various packages including a multitude of visualizations. Thus, it's a piece of cake to make our LocationView to actually display the location in a map. Check out the bonus code below.
Code for the LocationView to show the current location in a FlutterMap
First, include the flutter_map and latlong packages in the pubspec.yaml of your package:
Make sure to run pub get in both the package and application. Next, paste the following view into your LocationView:
import 'dart:io';

import 'package:claid/ui/CLAIDModuleView.dart';
import 'package:flutter/material.dart';
import 'package:flutter_map/flutter_map.dart';
import 'package:latlong2/latlong.dart';

import 'datatypes/my_package_datatypes.pb.dart';

class LocationViewWithMap extends CLAIDModuleView {

    String imagePath = "packages/my_new_package/assets/images/location_icon.png";

    LocationViewWithMap(
        super.entityName,
        super.mappedModuleId, super.moduleClass,
        super.moduleManager, {super.key});

    @override
    State<LocationViewWithMap> createState() => _LocationViewWithMapState();

    @override
    Widget getSubCaptionWidget()
    {
        return Column(
            crossAxisAlignment: CrossAxisAlignment.start, // for left side
            children: [
            Row(
                children: [
                Text("Active", style:TextStyle(fontSize: 15, color: Colors.white)),
                SizedBox(width:5),
                Icon(Icons.circle,
                    size: 15,
                    color: Colors.green,
                ),
                ],
            ),
            Text("Current location: ??", style:TextStyle(fontSize: 15, color: Colors.white)),
            ]
        );
    }

    Widget getImage(BuildContext context)
    {
        return Image.asset(this.imagePath,
        height: MediaQuery.of(context).size.height * 0.075,
        width: MediaQuery.of(context).size.width * 0.125,
        );
    }

    String getName()
    {
        return super.mappedModuleId + "(LocationSensor)";
    }

    String getModuleType()
    {
        return "Sensor";
    }
    String getModuleSubType()
    {
        return "(internal)";
    }

}


class _LocationViewWithMapState extends State<LocationViewWithMap> with AutomaticKeepAliveClientMixin
{
    final MapController _mapController = MapController();
    // Coordinates for the map
    LatLng _currentLocation = const LatLng(47.375769645435355, 8.539287660811995); // Example coordinates for San Francisco

    @override
    void initState() {
        super.initState();

        widget.subscribeModuleChannel(
            "LocationChannel",
            LocationSensorData(),
                (data) => onLocationData(data));
    }

    void onLocationData(LocationSensorData data)
    {
        setState(() {
        _currentLocation = LatLng(data.latitude, data.longitude);
        _mapController.move(_currentLocation, 10);
        });
    }
    // This widget is the root of your application.
    @override
    Widget build(BuildContext context) {
        return Column(
        children: [
            SizedBox(height: 50,),
            Text("The current location is:\nLatitude: ${_currentLocation.latitude}\nLongitude: ${_currentLocation.longitude}"),
            SizedBox(height: 50,),
            Container(
            height: MediaQuery.of(context).size.height*0.5,
            child: FlutterMap(
                mapController: _mapController,
                options: MapOptions(
                    minZoom: 10.0,
                    initialCenter: _currentLocation,
                ),
                children: [
                    TileLayer(
                        urlTemplate: 'https://{s}.tile.openstreetmap.org/{z}/{x}/{y}.png',
                        subdomains: ['a','b','c']
                    ),
                    MarkerLayer(
                        markers: [
                        Marker(
                            width: 45.0,
                            height: 45.0,
                            point: _currentLocation,
                            child: IconButton(
                                icon: Icon(Icons.add_location),
                                onPressed: () {
                                    print('Marker tapped!');
                                }
                            )

                        )
                        ]
                    )
                ]
            ),)
        ],);
    }
    bool get wantKeepAlive => true;

}
You should get the following output: